How to Use a Garden Tiller for Easy Backyard Tilling
Want to prep backyard soil with less effort? The YERYORK 15-Amp Electric Garden Tiller makes tilling easy and efficient. This blog walks through its powerful motor, wide tilling coverage, and adjustable depth settings—perfect for home gardeners. From soil prep to aftercare, discover how YERYORK turns tough ground into planting-ready space in just a few simple steps.
Tilling your backyard doesn’t have to be a back-breaking chore. Whether you're starting a vegetable bed, revitalizing tired soil, or prepping for spring planting, using a garden tiller can save time and energy while improving the health of your garden. In this guide, we'll walk you through the benefits of tilling, how to choose the right equipment, and how to use a tiller for gardening like a pro.

Why Use a Garden Tiller for Backyard Projects
Tilling is the process of breaking up and turning over soil to prepare it for planting. It helps loosen compacted earth, promotes better aeration, and allows roots to access nutrients more effectively. When done properly, tilling also makes it easier to incorporate compost, fertilizer, or other soil amendments.
For small garden spaces, a hand tiller can be effective, giving you control for detail work. But for medium to large backyards or tougher soil conditions, a garden tiller—especially an electric model—can do the heavy lifting. These tools churn soil quickly and deeply, which makes planting more efficient and improves long-term soil structure.
Using a tiller for gardening allows beginners and experienced gardeners alike to create ideal planting conditions without spending hours with a shovel.
Choosing the Right Tiller for Gardening
Not all tillers are created equal. There are two main categories: manual (hand tillers) and electric tillers. Manual tillers work well for raised beds and tight corners but require physical effort. Electric tillers, on the other hand, provide consistent power and deeper reach—ideal for larger plots.
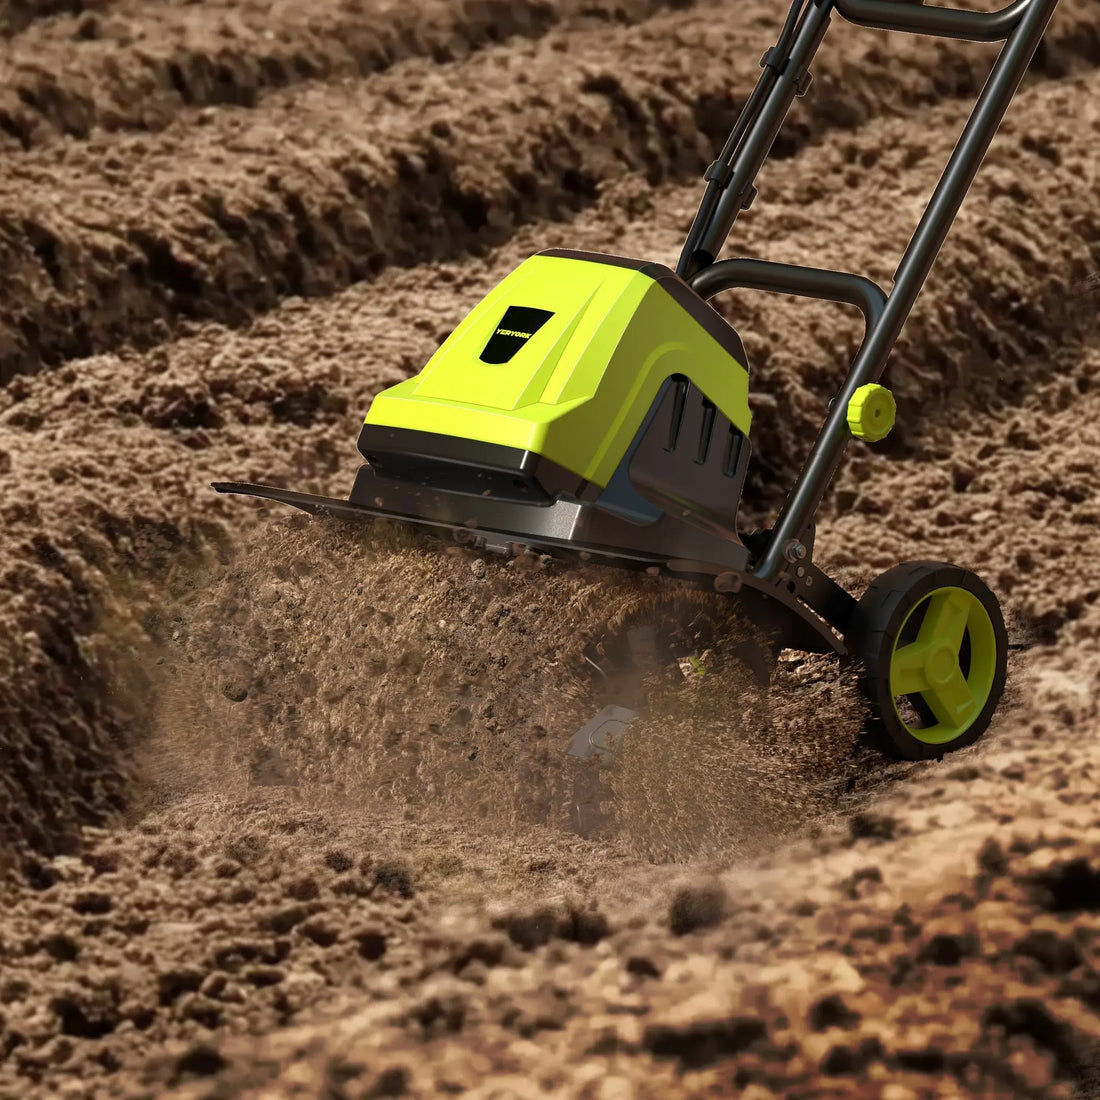
The Yeryork 15-Amp Electric Garden Tiller stands out as a strong option. Here’s why:
l Powerful 15-Amp Motor: With the ability to till up to 18 inches wide and 9 inches deep, this machine can handle compact soil and larger beds effortlessly.
l Adjustable Tilling Depth: Its 4-position wheel system allows for precise depth control, which is crucial for different types of crops and soil conditions.
l Heavy-Duty Steel Tines: The tiller features 24 angled steel tines, ensuring even tough or rocky soil is properly broken up and blended.
l Eco-Friendly Design: Because it’s electric, you won’t need gas or oil—making it cleaner, quieter, and easier to maintain.
l Extended Warranty: With up to 3 years of coverage, it's a reliable investment for long-term gardening needs.
For most homeowners, this electric garden tiller provides the best balance of performance, convenience, and value.

Step-by-Step: How to Till Your Backyard Garden
Now that you've chosen your tiller, it's time to get your hands dirty—strategically.
Step 1: Prep the Soil
Before tilling, remove any large debris like rocks, branches, or old roots. Make sure the soil is slightly moist; overly dry soil will be dusty and ineffective, while wet soil can clump and compact.
Step 2: Set Your Depth
For initial tilling, set the depth between 6–9 inches. The hand tiller may be useful around plant edges or raised beds where more control is needed.
Step 3: Start Tilling
Turn on the garden tiller and begin in straight rows. Let the machine do the work—don’t force it forward. Overlap each row slightly to ensure thorough coverage. If you’re incorporating compost or fertilizer, spread it over the area before tilling.
Safety Tips:
• Wear protective gloves and closed-toe shoes.
• Keep the cord (if using an electric model) clear of your path.
• Never tilt the tiller while the motor is running.
By following these steps, your soil will be aerated and primed for planting—whether you’re starting a vegetable patch or adding flowers to your landscape.

Aftercare & Tips for Ongoing Garden Success
Taking care of your tiller ensures it will serve you through many growing seasons. After each use:
- Clean off soil and debris, especially from the tines.
- Store in a dry place to prevent rusting. The Yeryork model’s foldable handle makes this easy.
- Check your warranty info—the Yeryork electric tiller for gardening offers an extended 3-year warranty if you register it.
Soil Care Tips:
• Add organic compost during re-tilling sessions to boost nutrients.
• Avoid over-tilling, which can disrupt soil structure—once or twice per season is usually enough.
• Keep an eye on moisture levels and consider mulching to retain hydration and reduce weed growth.
By regularly improving your soil, your plants will thrive and your backyard garden will become a source of satisfaction season after season.